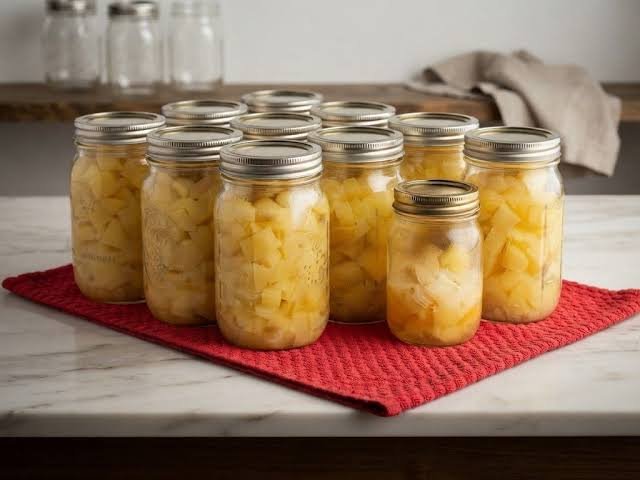
Learning how to store fresh food for a long time is one of the most rewarding skills you can ever pick up in your kitchen journey. When you learn how to handle food preserving correctly, you unlock a wonderful world of self reliance and delicious comfort that stays ready in your pantry whenever you need a hearty meal. Canning potatoes at home is a simple yet life changing process that allows you to capture the humble potato at its peak quality and store it safely for months or even years without needing a freezer. Imagine opening your pantry shelf on a busy weekday evening and pulling out a jar of tender, perfectly prepped potatoes that are ready to be tossed directly into a sizzling pan or a bubbling pot of warm soup. This reliable preserving method is all about making your daily cooking life easier while saving you precious time and hard earned money.
People all across the world absolutely adore pressure preserved potatoes because they offer unmatched convenience without sacrificing natural flavor or comforting texture. Standard store bought canned vegetables often contain unnecessary chemical additives or excess sodium, but making them in your own kitchen puts you in total control of every single ingredient. Food lovers appreciate how versatile these preserved spuds are because they hold their shape remarkably well while soaking up all the wonderful seasonings you choose to add later during final cooking. When you take the time to prepare these jars, you are creating a shortcut to quick dinners, sudden craving fixes, and warm family gatherings. There is an immense sense of pride that comes from looking at a clean row of clear glass jars filled with neat golden potato cubes lining your pantry shelves.
You might decide to embark on this kitchen project for many emotional, practical, and lifestyle reasons that make absolute sense for your home routine. From a budget perspective, buying large bags of fresh spuds when they are on sale or harvesting a huge crop from your backyard garden saves a lot of money, but fresh tubers can rot quickly if left in a humid bin. Preserving them eliminates food waste entirely while ensuring that your family always has access to wholesome, carbohydrate rich food during any season or unexpected emergency. On an emotional level, opening a jar of home preserved food brings a deep feeling of warmth, nostalgia, and genuine connection to traditional home cooking skills passed down through generations. From a fitness standpoint, having pre cooked whole food carbohydrates sitting on your shelf makes healthy meal prep incredibly fast, helping you avoid ordering fast food when you feel tired after a long day at work.
Mastering this basic homesteading technique will boost your confidence in the kitchen and give you peace of mind knowing your family is well fed with clean ingredients. You do not need to be a professional chef to achieve success with pressure preserving as long as you follow basic safety guidelines and prepare your vegetables with care. Fresh spuds are low acid foods, which means they must always be processed using a dedicated pressure vessel rather than a simple boiling water bath to ensure complete safety and proper preservation. Once you get past the initial setup, the actual work is straightforward, relaxing, and deeply satisfying to perform. By following this easy step by step guide, you will transform basic root vegetables into shelf stable treasures that make weeknight dinners feel completely effortless.
Ingredients You Will Need
To preserve your root vegetables safely and achieve the best possible taste, you will need the following basic items and simple kitchen ingredients ready on your counter:
-
Fresh yellow or red potatoes: 10 pounds (peeled and diced into neat cubes)
-
Boiling water: 8 to 10 cups (to fill the glass jars)
-
Canning salt or pure sea salt: 1 teaspoon per quart jar (optional for flavor, do not use iodized table salt)
-
Fresh water for boiling: as needed for the initial blanching step
-
Canning jars with fresh lids and metal rings: 7 quart size jars or 9 pint size jars
Step by Step Method
Following a clean and precise sequence ensures that your final jars are completely safe, beautiful, and delicious. Here is the entire process explained in simple terms for beginners.
Preparing Your Kitchen and Tools
First, make sure your kitchen counter, cutting boards, and utensils are thoroughly washed with warm soapy water. Inspect all your glass jars carefully for any hairline cracks, small chips around the rim, or rough spots that could prevent a tight vacuum seal. Wash your jars, new flat lids, and metal rings in warm soapy water, then rinse them completely clean. Keep your clean jars warm by placing them in a large pot filled with hot water or inside a running dishwasher on the warm hold setting so they do not break when filled with hot liquid later.
Washing and Peeling the Potatoes
Take your fresh potatoes and scrub them thoroughly under cool running tap water to remove all visible dirt and soil particles. Use a standard vegetable peeler to remove all the skin completely from every tuber. It is very important to remove the skin when preserving root vegetables because the skin can carry natural soil bacteria that affects safety and texture. After peeling, cut away any green spots, dark eyes, or bruised areas using a small paring knife until you have clean, clear potato flesh.
Dicing and Soaking
Cut your peeled tubers into uniform cubes that are about 1 inch in size so they heat evenly inside the jars. Avoid making the pieces too small or mashing them, because thick starches can interfere with heat distribution inside the pressure vessel. As you finish dicing each piece, drop the cubes into a large bowl filled with cool tap water. Soaking the diced pieces in cool water for about 10 minutes helps remove excess surface starch, which keeps your jar liquid clear and prevents the pieces from becoming gummy.
Blanching the Pieces
Drain the cold soaking water off your cubed spuds and transfer them into a large stockpot filled with fresh water. Bring the pot to a boiling state over high heat and let the pieces cook for exactly 2 minutes. This brief cooking step is called hot packing, and it heats the vegetable tissue through, drives out trapped air, and prevents the pieces from shrinking excessively inside the jar during processing. Do not overcook them during this stage; you want them firm, not soft or fully cooked.
Packing the Jars
Carefully lift your warm, clean glass jars out of their warm water bath using jar tongs and set them on a clean kitchen towel laid out on your counter. Use a wide mouth funnel and a slotted spoon to transfer the hot, blanched potato cubes into the warm jars. Leave a generous 1 inch of empty space between the top of the food and the top rim of the glass jar; this empty area is called headspace and is vital for creating a proper vacuum seal. If you want to add salt for flavor, add 1 teaspoon of canning salt to each quart jar or half a teaspoon to each pint jar now.
Adding Boiling Water and Removing Air Bubbles
Pour clean boiling water over the hot potato pieces in each jar using a liquid measuring cup or ladle. Maintain that same 1 inch headspace at the top of every jar so the liquid completely covers the vegetable pieces without overflowing. Take a clean plastic bubble remover tool or a smooth silicone spatula and gently slide it down along the inside walls of each jar to release any trapped air bubbles. Recheck your headspace measurement after removing bubbles, adding a tiny splash more boiling water if the liquid level dropped.
Sealing and Processing
Wipe the top glass rim of every jar with a clean paper towel dampened with warm water or white vinegar to remove any traces of starch, salt, or moisture. Place a clean, flat lid directly on top of each jar rim, then screw a metal ring band over the lid until it is fingertip tight. Place your packed jars carefully into your pressure preserving vessel containing 2 to 3 inches of hot water. Fasten the vessel lid securely, leave the vent pipe open, and allow steam to vent continuously for 10 full minutes before placing your weight or regulator gauge on top. Once the pressure reaches 11 pounds on a dial gauge or 10 pounds on a weighted gauge, process quart jars for 40 minutes or pint jars for 35 minutes.
Cooling and Storage
When the processing time finishes, turn off the heat source completely and allow the pressure vessel to cool down and depressurize all on its own without touching the weight or running cold water over the lid. Once the pressure drops to zero naturally, carefully remove the lid away from your face to avoid hot steam. Use jar tongs to lift the hot jars straight out of the vessel without tilting them, placing them onto a towel lined counter in a draft free room. Let the jars sit completely undisturbed for 12 to 24 hours while you listen for the satisfying popping sounds that signal successful tight seals. Test each seal by pressing the center of the metal lid; if it stays down flat and does not flex, your jars are sealed, ready to be labeled, and stored in a cool dark pantry.
Why This Recipe Is Special
This home preservation method is incredibly special because it gives you absolute control over what goes into your family body. Commercial canned foods are often packed with high amounts of sodium, chemical stabilizers, and artificial preservatives designed to extend shelf life, whereas this simple homemade recipe uses only pure water, fresh root vegetables, and a pinch of natural salt.
From a nutritional standpoint, root vegetables are an incredible source of clean energy, complex carbohydrates, dietary fiber, essential potassium, and vital vitamin C. When you process them properly in glass jars, you lock in these vital nutrients so they are ready to nourish your body whenever you need a fast meal.
The taste of home preserved potatoes is surprisingly fresh, clean, and buttery compared to store bought alternatives that can sometimes taste metallic or overly salty. The texture remains firm enough to handle pan frying, roasting, or simmering in stews without turning into mush. Having these jars ready on your pantry shelf eliminates the tedious task of peeling, cutting, and boiling spuds every single time you want to prepare a hearty dinner.
Extra Tips for Better Taste
Taking a few small extra steps during preparation can elevate the flavor and appearance of your final dishes significantly.
-
Choose firm potato varieties like Yukon Gold or red potatoes because they hold their shape better during high heat processing compared to russet varieties.
-
Always use dedicated canning salt or pure sea salt rather than standard iodized table salt to prevent your liquid from turning cloudy or dark.
-
When you open a jar to cook dinner, drain the liquid and toss the cubes in garlic powder, smoked paprika, and olive oil before roasting them in a hot oven for maximum crispiness.
-
Pan fry the drained cubes in a cast iron skillet with a little butter and diced onions to create the ultimate fast breakfast hash browns in under ten minutes.
-
Add these pre cooked cubes directly into your favorite creamy soups or beef stews during the final ten minutes of cooking so they absorb the savory broth without breaking down.
Final Thoughts
Preserving your own food at home is a deeply rewarding culinary journey that connects you with time honored kitchen traditions while making modern meal preparation simple and fast. Filling your pantry with clear jars of perfectly prepped root vegetables gives you a great sense of accomplishment, financial savings, and total peace of mind. Once you try your first jar of crisp pan fried home preserved spuds on a busy weeknight, you will realize how valuable this simple skill truly is. Enjoy the process, share your creations with loved ones, and take pride in building a self reliant kitchen!
Nutrition Details
Here is an estimated nutritional breakdown for one standard serving of home preserved potatoes cooked without extra oil or fat:
| Nutritional Element | Amount Per Serving |
| Serving Size | 1 cup diced pieces |
| Calories | 110 kcal |
| Total Carbohydrates | 26 grams |
| Dietary Fiber | 3 grams |
| Sugars | 1 gram |
| Protein | 3 grams |
| Total Fat | 0 grams |
| Sodium | 150 milligrams |
| Potassium | 620 milligrams |
| Vitamin C | 20 percent daily value |
Disclaimer
This article is provided for general educational and informational purposes only. Everyone’s body, health status, and nutritional requirements are unique, meaning individual results and dietary needs may vary. Always follow proper home food preservation guidelines published by trusted agricultural extension services to ensure safe processing procedures. If you have specific medical conditions, sodium restrictions, or dietary concerns, please consult with a qualified healthcare professional or registered dietitian before making significant changes to your meal plan.