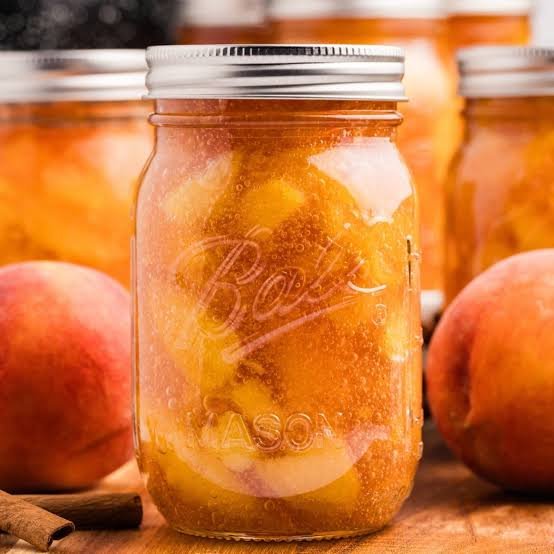
Home canned peach pie filling is one of the absolute best ways to capture the warm sweet essence of summer and keep it inside a glass jar on your pantry shelf all year long. Imagine opening a jar during the middle of a cold winter day and smelling the exact same vibrant floral aroma of freshly picked sun ripened peaches that you bought at the farmer market back in July. This recipe is designed to guide you through every single step of the traditional hot pack water bath canning method so you can create a thick rich fruit filling that is ready to be poured straight into a pie crust, spooned over warm vanilla ice cream, or layered into morning yogurt. Making your own fruit preserves at home gives you total control over the ingredients, which means you never have to worry about artificial high fructose corn syrup, synthetic food dyes, or chemical preservatives that are so often found in commercial grocery store cans.
People absolutely adore this homemade preserve because the flavor and texture are completely unmatched when compared to anything you can buy off a store shelf. Store bought fillings often taste flat, overly gummy, and sticky, whereas this homemade version keeps the actual bite and integrity of real peach slices while wrapping them in a velvety clear syrup spiced with subtle sweet notes. It brings an immense sense of pride when you look at your pantry shelves and see rows of glowing golden jars that you crafted with your own hands. Beyond the amazing taste, sharing these gorgeous glass jars with friends, family, and neighbors makes for one of the most thoughtful and heartwarming homemade gifts you can possibly give during holidays or special gatherings. Everyone loves receiving a delicious edible present that was clearly made with love, care, and time.
There are so many wonderful reasons and special occasions to dive into this fun kitchen project during the height of peach season. From an emotional standpoint, spending an afternoon peeling and slicing sweet fresh fruit connects us to classic traditions of self reliance and nostalgic memories of cooking alongside parents or grandparents in cozy sunlit kitchens. From a practical and financial perspective, buying fresh peaches in bulk during their peak harvest season when prices are low allows you to save money while preserving food at its peak nutritional value. Even from a fitness and wellness perspective, making your filling at home means you can select healthier natural sweeteners, adjust the overall sugar concentration, and ensure that your family is enjoying whole real fruit without hidden industrial fillers or unwanted chemical additives.
Having a stock of ready to bake pie filling on hand in your home kitchen is the ultimate convenience secret for busy bakers and home cooks who want to save time. Whenever unexpected guests arrive or you suddenly need to bring a dessert to a potluck dinner, you can simply roll out your favorite dough, pour in a pint or quart of this glorious mixture, and pop it directly into the oven without having to wash, peel, pit, or simmer fresh fruit from scratch. It simplifies your baking routine while dramatically raising the quality of your finished desserts. Once you experience how effortless and rewarding it is to pop open a jar of custom spiced fruit and smell that sweet summer sunshine, you will truly never want to go back to buying canned commercial filling ever again.
Ingredients You Will Need
To make seven quart jars of delicious homemade pie filling, you will need the following fresh and pantry items prepared:
-
Fresh Peaches: 6 quarts or about 12 pounds of ripe but firm peaches
-
Granulated White Sugar: 4 and one half cups
-
ClearJel Canning Starch: 1 cup and 2 tablespoons (must use modified cornstarch made for canning)
-
Cold Water: 2 and one half cups
-
Unsweetened Apple Juice: 1 and three fourths cups
-
Bottled Lemon Juice: 7 tablespoons (do not use fresh lemon juice to ensure proper safe acid levels)
-
Ground Cinnamon: 1 teaspoon
-
Ground Nutmeg: one half teaspoon
Step by Step Method
Preparing Your Equipment
Start by thoroughly washing your glass canning jars, metal bands, and new flat lids in hot soapy water, then rinse them completely. Place your clean jars into a large water bath canner, fill it with water until the jars are covered, and heat the water to keep the glass jars hot until you are ready to fill them. Keeping your jars hot prevents them from cracking when hot fruit filling is poured inside. Place your flat lids into a small saucepan of warm water on low heat so the soft sealing rings become flexible and ready to form a tight vacuum seal.
Blanching and Peeling the Fruit
Bring a very large pot of water to a rolling boil on your stove top. Fill a second large bowl with ice water and place it nearby. Carefully lower four or five whole peaches into the boiling water and leave them there for roughly sixty seconds until you see the skins start to split. Use a slotted spoon to transfer the hot peaches directly into the cold ice bath. The sudden temperature shock will make the skins slide off effortlessly using just your fingers. Remove the skins, cut the peaches in half to remove the hard center pit, and slice the fruit into uniform thick wedges.
Precooking the Peach Slices
To keep your peach slices from turning brown while you prepare the rest, you can submerge them in a simple liquid bath containing water mixed with a little lemon juice. Next, bring a large pot of plain water to a boil, drop in your sliced peaches, and let them cook for just one minute to warm them through completely. Drain the hot peach slices well using a colander and keep them warm in a covered bowl while you prepare the rich sweet syrup base.
Cooking the Thickened Syrup
In a large stainless steel kettle, combine your sugar, ClearJel starch, ground cinnamon, and ground nutmeg. Mix these dry ingredients together thoroughly so the starch does not clump up later. Pour in the cold water and the unsweetened apple juice while whisking constantly over medium high heat. Continue stirring the mixture continuously as it heats up. The mixture will begin to bubble, thicken significantly, and turn clear. Once it reaches a full boil, pour in the bottled lemon juice and boil the thick syrup for one additional minute while whisking without stopping.
Combining Fruit and Syrup
Remove the thick spiced syrup from your heat source immediately. Take your warm drained peach slices and gently fold them into the hot syrup using a soft silicone spatula or large spoon until every single fruit slice is evenly coated. Place the pot back over low heat for three to five minutes just until the entire fruit mixture is heated all the way through, taking care not to overcook or smash the soft fruit slices.
Filling the Glass Jars
Carefully lift one hot glass jar out of your canner, draining any water inside back into the pot. Use a wide mouth funnel to scoop the hot fruit filling into the jar, leaving a generous one inch of empty space at the very top of the jar. This empty space is called headspace, and it allows the food to expand during processing without overflowing. Slide a clean plastic bubble remover tool down the inside walls of the jar to release any trapped air pockets, then adjust the filling level if needed to maintain that exact one inch headspace.
Sealing and Processing
Wipe the top rim of the glass jar with a damp clean cloth to remove any sticky syrup residue that might prevent a proper seal. Place a warm flat lid onto the center of the jar and screw the metal band down until it is fingertip tight. Place the filled jar back into your hot water bath canner. Repeat this process for all remaining jars. Ensure the water level in the canner covers the tops of the jars by at least one to two full inches. Cover the canner with its lid, bring the water to a full rolling boil, and process quart jars for thirty minutes (or twenty five minutes if using pint jars).
Cooling and Storing
Once your processing time is complete, turn off the heat and remove the canner lid. Let the jars rest quietly inside the hot water for five minutes to stabilize. Use a jar lifter tool to gently lift the jars straight up out of the water and place them onto a thick dry towel on your kitchen counter, leaving space between each jar. Allow the jars to cool undisturbed for twelve to twenty four hours. You will hear satisfying pinging sounds as the lids pull downward and vacuum seal tight. Check the seals the next day, remove the metal ring bands, wipe the glass clean, and store your delicious home canned pie filling in a cool dark pantry.
Why This Recipe Is Special
This particular canning method stands out because it yields professional quality results directly from your home kitchen while keeping safety and nutritional integrity at the forefront. Using ClearJel as the primary thickener is what makes this formula superior to old fashioned recipes that relied on regular flour or standard cornstarch. Regular kitchen starches tend to break down, turn watery, or become lumpish under the intense heat of a pressure or water bath canner, whereas modified canning starch creates a silky glossy texture that stays perfectly thick even after months on a shelf.
Additionally, this recipe focuses on preserving whole nutritional value. Peaches are naturally rich in dietary fiber, vitamin A, vitamin C, and essential antioxidants like beta carotene. By canning them at their natural peak harvest window, you lock in these vital nutrients far better than commercial factories that mass process imported produce. The inclusion of pure unsweetened apple juice and fragrant spices enhances the natural fruit sugars, allowing you to use less refined white sugar while still enjoying a rich indulgent flavor profile.
| Attribute | Benefit |
| Texture Control | Stays glossy and thick without separating or thinning out over time |
| Nutrient Retention | Preserves natural vitamins A and C from fresh peak harvest peaches |
| Flavor Balance | Real ground spices and fruit juice highlight natural peach sweetness |
| Long Shelf Life | Stays safe and delicious on your pantry shelf for twelve to eighteen months |
Extra Tips for Better Taste
To elevate your canned pie filling from great to truly extraordinary, try implementing a few simple creative kitchen tweaks:
-
Choose Freestone Peaches: Always look for freestone peach varieties rather than clingstone types when buying in bulk. The flesh of freestone peaches separates effortlessly from the inner pit, saving you massive amounts of time and keeping your fruit slices clean, uniform, and beautiful.
-
Firmness Matters: Select fruit that is fully ripe and fragrant but still firm to the touch. Overly soft or mushy fruit will break down during the hot bath processing and turn into sauce instead of holding nice solid pie slices.
-
Layer Your Spices: Consider adding a tiny pinch of ground ginger or a teaspoon of pure vanilla bean paste into your syrup along with the cinnamon and nutmeg. Vanilla bean adds a luxurious bakery style aroma that pairs magnificently with warm peaches.
-
Maintain Correct Acid Levels: Always use store bought bottled lemon juice instead of fresh lemons. Bottled versions have a standardized uniform acidity level that is strictly required to guarantee safe acid levels for water bath processing.
Final Thoughts
Canning your own peach pie filling is a wonderfully satisfying domestic craft that blends practical pantry preparation with pure culinary joy. When you take the time to convert fresh summer fruit into sparkling golden jars of ready to use filling, you invest in future quick meals, memorable holiday bakes, and heartfelt gifts for people you care about. The process is completely simple once you follow the step by step guidelines, and the final reward of tasting real summer flavor in the depth of winter is something every home cook deserves to experience. Set aside an afternoon, gather your jars, and enjoy every single step of this delicious preserve making journey.
Nutrition Details
Here is the estimated nutritional breakdown for a standard serving size of this sweet homemade filling:
| Nutrient | Amount Per Serving (approx. one half cup) |
| Calories | 165 kcal |
| Total Carbohydrates | 42 g |
| Dietary Fiber | 2 g |
| Sugars | 36 g |
| Protein | 1 g |
| Fat | 0 g |
| Vitamin C | 10% Daily Value |
| Vitamin A | 8% Daily Value |
| Calcium | 12 mg |
| Potassium | 185 mg |
Disclaimer
This recipe and its accompanying nutritional details are provided strictly for general informational and educational purposes. Everyone’s body, health conditions, dietary requirements, and metabolic responses are unique, which means individual nutritional results and dietary needs may vary. Always ensure you follow proper food safety standards, accurate headspace measurements, and validated canning guidelines. If you have specific dietary restrictions, health conditions, or food allergies, consult with a qualified professional or healthcare provider before introducing new home preserved foods into your diet.